
Redirect Web Visitors By Country Using .NET Framework in C# or VB.NET
There are times when it is useful to redirect a visitor to different default web page based on the visitor’s country of origin. One practical usage is to redirect visitor to web page with the language recognized by the visitor.
This article shows you how by using .NET component, it can be done.
Let us take a simple case study. Company XYZ is multi-national company with major customers from United States and Japan. The company official website is developed in both English and Japanese languages. The default page is in English language and visitor can switch to Japanese by changing the default language option. There exists a potential problem when a Japanese visitor does not understand English and it could not navigate the web site. So let us develop a simple solution to help Company XYZ redirecting all Internet traffic from country Japan to the Japanese language site. Meanwhile it drives the rest traffic to English site.
In this example, we use a fully functional IP2Location(TM) .NET component available at http://www.ip2location.net/download/IP2LocationDotNetComponent.ZIP to query country by visitor’s IP address. Firstly, install the IP2Location(TM) .NET component. The IP2Location(TM) .NET component will be installed in your local drive. Next, get the IP2Location.DLL .NET component and sample database from the directory, ie. c:Program FilesIP2Location by default. You need to add a reference to this component from your Visual Studio web project. A copy of this component will be copied into /bin directory under the project. For unregistered component, there is a random 5-second delay in one out of ten queries.
Let’s assume the English web page as index_en.htm and Japanese web page as index_jp.htm. We implement a simple script default.asp to detect visitor’s country of origin. If the visitor is from Japan, then redirect him/her to index_jp.htm, otherwise index_en.htm. Simple? Here is the code and the comments serve as explanation default.asp.
Compile and upload this project to the web site. All visitors will go through this screening before redirect to an appropriate web page.
Using IP2Location;

private void Query(string strIPAddress)
{
    IPResult oIPResult = new IP2Location.IPResult();
  try
  {
    if (strIPAddress != "")
    {
       IP2Location.Component.IPDatabasePath = "C:Program FilesIP2LocationDatabaseIP-COUNTRY.SAMPLE.BIN";
       oIPResult = IP2Location.Component.IPQuery(strIPAddress);
      switch(oIPResult.Status.ToString())
	  {
		case "OK":
			if (oIPResult.CountryShort == "JP") {
				Response.Redirect("index_jp.htm")
			} else {
			   Response.Redirect("index_en.htm")
			}
		  	 break;
		case "EMPTY_IP_ADDRESS":
			Response.Write("IP Address cannot be blank.");
			break;
		case "INVALID_IP_ADDRESS":
			Response.Write("Invalid IP Address.");
			break;
		case "MISSING_FILE":
			Response.Write("Invalid Database Path.");
		break;
	  }
    }
    else
    {
    Response.Write("IP Address cannot be blank.");
    }
  }
  catch(Exception ex)
  {
      Response.Write(ex.Message);
  }
 finally
 {
	oIPResult = null;
  }
}.NET HTML Editor Control For Windows Form Based Applications
Building an HTML WYSIWYG editor oriented Windows Form application on .NET Framework could never been simpler. You are a .NET Developer, looking for a WYSIWYG editor control that will take / return HTML string and you want that your application should run on .NET 2.0, 3.0, 3.5 and 4.x, right ? You have landed to the right place. SpiceLogic offers you a highly efficient .NET WYSIWYG editor control for Windows Forms which GETs and SETs HTML string. You can use this control for developing windows applications like Web Page Content editor, full Web Page editor, email message composer or any application that uses a rich formatted text editor for your user. The control comes with 2 special value properties, “BodyHtml” and “DocumentHtml”. The BodyHtml Gets/Sets the partial html content like [b] Hello World[/b]. The Document HTML Gets/Sets the whole HTML document which can be used for a full web page like [HTML][head][/head][body][b] Hello World [/b][/body][/HTML].
The editor comes with many HTML editing tools. You can customize all of the items in the toolbars. Even if you do not want to use the default factory items and instead use your own, this control provides you a user friendly interface to build your own toolbar items. All the factory items are fully customizable. Moreover, all toolbar item functionality can be implemented externally using the rich set of public methods. This time you do not need to be bothered about localization. You can customize all the texts and replace the factory provided dialogues with your own dialogues in your own language! It is highly optimized for Windows Vista 64 bit operating systems. Html value properties are optimized for Data Binding. It is featured with many useful public properties, methods, and events. A good spell checker is just built in there. Also body style can be edited using a rich GUI CSS editor, which is available both in Design time and run time.
Highlights:
Base and Relative URL support:
This control is highly suitable for HTML documents that have Relative Urls in it’s resource’s path reference. So, now you can show an image in the editor simply with the following tag : [img src=”myImage.jpg” /]. The control comes with a property named “BaseUrl”. You need to set that property to the image folder or internet url. So, Guess What !! You can ship your application to your user’s pc where you simply change the Base URL programmatically so that the images can be shown in any of your user’s PC.
Spell Checker:
This control is featured with a spellchecker. You can use your own dictionaries with the spellchecker.
Searching API:
Searching API is included with the control. You can use the default searching dialogue or you can implement the search dialogue yourself.
Customizable interface:
This control comes up with two factory toolbars, with many rich toolbar items. They are perfect enough to do almost all of your editing task. Also you can customize them. Even if you do not want to use them and instead use your own toolbar items, you can also do that.
Design mode and source mode:
There are two editing modes available. WYSIWYG design mode and Raw Html source mode which will give you a complete control over the HTML content.
Events:
Two feature events are worth mentioning. Pasting event and HTML Changed event. Guess What !! You can intercept the Pasting event and manipulate the pasting content from ClipBoard and apply your filter logic. Very much useful for filtering MS Word content while pasting. HTMLChanged event, fires as soon as the html is changed, similar to TextChanged property of a TextBox Control. Also you can change the default behavior of the loading and saving HTML to the editor to your needs.
Methods:
Lots of useful methods are there like getting or setting caret positions, scroll positions, GetPlainText() method. GetPlainText() method is not a return a simple text version of the HTML. Rather the returned text will preserve the layout of the original HTML content like tables, paragraphs etc. Cool isn’t it?
Properties:
Lots of useful properties are there like Scrollbar visibility properties (GET/SET), Read Only property (GET/SET), Word Wrap property (GET/SET). Property available for choosing Single Line Break or Paragraph on Enter key response.
Operations composite property contains Methods associated with the toolbar items. That is, if you want to create a button of your own and give it the default copy functionality, you can invoke the Copy() method of this property.
The SelectionState property as its name goes deals with the editor’s content. Like getting the attributes of the editor items and also to determine the state of current selection. It has properties like, IsBold, IsHyperLinkSelected, IsImageSelected, IsItalic etc. It contains one of the important properties ActiveHTMLElement of type IHTMLElement. This property gives you full programming control for getting the Active Element as Document Object Model and manipulating the Element (as a node).
DataBinding:
For Data Binding purpose you can bind any data sets’ string field to the editor’s BodyHtml or DocumentHtml properties. This will give you an excellent opportunity to use database models with the editor.
Styling the Document:
Apart from the designer mode and you can change the body style of the document right from the editor both in the designer mode and from run time.
Other exciting features include:
— Basic enough for even the most novice of users.
— Optimized for Vista 64 bit OS.
— Design time GUI Collection editor available for manipulating the properties of the toolbar items.
— Easier interface to add new toolbar item.
— HTML can be retrieve as plain old HTML, XHTML and XML
— Generates clean [span] tags for font elements; ([span]text here..[/span] (not [font]text here.[/font])
— GUI Dialog for Table Insert/Update
— GUI Dialog for editing table cells.
— GUI Search dialog; Search API is also available for implementing your own search user interfaces.
Coding Standards in C Sharp
At one time I implemented FxCop frequently to keep me in line and guarantee my projects satisfy C # coding criteria. Alas, I drifted from FxCop within the last year or two (I believe on account of laziness on my part). During that time, I have followed a number of coding standards all my own (many of which I'm not too satisfied with).
Recently, a colleague reintroduced me to FxCop (now called Code Analysis) and introduced me to StyleCop – and in between the two of those tools I could not be more happy. With those 2 whipping me in line I can actually say that my code looks similar to the code from the remainder of my team and vice versa. The aim is usually to have coding standards adhered to, but enforcing these standards is difficult to do with a Word file. Every team I've been on has a file for C # coding requirements, but if there is no method to assimilate that document with VS.NET or if the team does not take on regular code reviews you are going to have a very tough time enforcing these standards. Having the right tools included into Visual Studio.NET to always remind programmers whether their C # is meeting Microsoft's rules is massive from not just a "we are a consistent team" standpoint, but for self-gratification as well. Similar to executing unit tests and having all green check marks, there is gratification in running FxCop and StyleCop and seeing them both come back with 0 (zero) alerts.
For entertainment, I suggest choosing one of your existing projects and running both tools. Go over each of the alerts (regardless how minor they appear) and make the essential modifications. When you're done, review your work and ask yourself if you feel better about what you've changed. For me personally, incorporating XML commenting to every method and property just how StyleCop enforces appeared somewhat unnecessary, but it had a major impact on the readability of my code base for other team members. The hardest part about adoption of the tools is getting your coworkers to understand the motives for sticking to the process. Ultimately, they will be more happy when everyone has has used enforceable standards.
Mastering C # is not just about learning Object-Oriented concepts and syntax – it's also about standards and being a valued team member. A high-level of C # coding expectations will bring you many steps closer to your team when establishing excellent software. In between C # coding guidelines and quality control with unit testing your team will have tidy, trusted code that they'll rely upon for the foreseeable future.
FxCop is built-into Visual Studio .NET 2010 nowadays referred to as Code Analysis. Simply be certain to activate code analysis within the project properties window of your projects. StyleCop is found at http://stylecop.codeplex.com/ and it is definitely worth the cost (free).
Creating Non-Rectangular Custom Shaped Forms in C#
Custom shaped Windows Forms in any program are most commonly used for splash screens. However they are not limited to splash screens only, music players are a good example of that. For whatever use, the .Net Framework gives us two easy ways to achieve this effect, one using the Form property TransparencyKey and the other using the property Region.
Both methods require need a pre-created background image. You can choose to generate the image programmatically, but the whole point of this is to create stunning graphics which is easier to do with a good image editing program. Make sure your image has a contrasting background color. Remember, this is the color that will be filtered out, don’t make it similar to the rest of the image’s colors.
For the transparency method, simply:
1) Set the Form BackgroundImage to the image you created
2) Set the FormBorderStyle to None
3) Set the Form Width and Height to the BackgroundImage Width and Height
4) Set the Form TransparencyKey to Color.Fromargb(0,0,0) but replace 0,0,0 with your background color.
For the region method:
1) Set the Form BackgroundImage to the image you created
2) Create a new System.Drawing.Drawing2D.GraphicsPath object.
3) Go through each pixel of the BackgroundImage, for any pixel that does not match the background color (Color.Fromargb(#, #, #)), add a new rectangle to the GraphicsPath object. The rectangle will be created with new Rectangle(x, y, 1, 1), x and y being the coordinates of the given pixel.
4) Set the Form Region to new Region(GraphicsPath object here)
Dynamics GP Development in Dexterity, EConnect, VBA
Mid-market Corporate ERP applications typically have variety of the programming tools and methods. Great Plains is open for modifications via such tools, as Dexterity, Modifier with VBA, MS Visual Studio SDK, Extender. There are several tools, dedicated to the integrations: eConnect, Integration Manager and to certain extent you can use your skills in SQL stored procedures. The variety has the other side of the coin, where you need to be sure that you have clear understanding on what you plan to accomplish and that you select the appropriate tool. Let’s review each tool individually and try to help you in the selection process:
1. Dexterity. This is more than just a tool, this is the whole architecture of this application, where you define such objects, as fields, tables, forms, windows, buttons, constants and make them work together via Sanscript procedures, functions, triggers and the script associated with the fields. We are not providing detailed documentation here, and you may expect more objects to discover, we are just giving you’re the idea on what it is. Dexterity is good, if you plan to change user interface or add new tables to the company or Dynamics database. However, if you are planning on something like web programming, Dex might be not your first choice, as this technology was introduced in earlier 1990th, where we didn’t have such concepts as web service, Microsoft.Net, XML. Please, keep reading the next paragraph on eConnect.
2. eConnect SDK. We already mentioned above that it is rather integration tool, initially it was planned for ecommerce web developers to integrate shopping cart as Sales Order Processing Invoice with customer deposit. Well, that fact might look like a limitation, but imagine the following scenario. You are programming your web interface as the.Net project in Microsoft Visual Studio C# or VB. In this project you build your own web based buttons, fields, icons and you are including eConnect libraries in the project to reference GP transactions and master records. This scenario makes eConnect the champion in the tools selection for the ecommerce, customer, vendor, or employee self-service web based applications. As a C# programmer you might be excited at this point, be sure, that you already reviewed such web technology based tools as GP Business Portal, and various web add-ons for Great Plains.
3. VBA scripting. There are two tools, where VBA is open for you to deploy: Modifier and Integration Manager. Let’s make these two stops and review. Modifier does just what it name suggests – it allows you to modify existing forms, and other resources. Modification of the form means the possibility to change existing fields position and visibility as well as placing new fields on the forms and windows. New fields could be animated with VBA scripts, it is even possible to change associated table records via traditional Microsoft ADO (pre.Net). And the second tool is Integration Manager, where VBA scripts could intervene in the event handling logic. For example, you may introduce Before Integration VBA script, where you are loading text file into custom MS SQL Server table, and the following integration is based on the Advanced ODBC query to load new records directly from SQL View or newly created custom table.
4. Some cautions. So far all these tools look good and even pretty cool, don’t they? Please, consider some level of the conservatism. First of all Dexterity is semi proprietary and it commands long learning curve, if you have several years of Dexterity programming with your previous employer under your belt, then it might be a way to go. But for generic C#, VB programmer we do not really recommend to invest into Dex training and learning curve, especially when your customization project has moderate magnitude. Second caution – please try to stay away from direct SQL Insert and Update statements, as these clauses might lead to data compromising.
5. New customization tools. We also recommend you to keep your eye on such tools as Microsoft Visual Studio Tools for GP. Here you should be able to modify user interface in the manner, similar to Dexterity. We do not recommend this tool for large magnitude customization project, as it might require some work to be done in Dex, especially new tables creation.
6. Reporting. If you just need to open GP for reporting, we recommend you to take a look at traditional tools, such as Crystal Reports, MS Access, MS Excel, and new tools, such as Microsoft SQL Server Reporting Services (often referred as SSRS). For pure financial reports, such as Balance Sheet, Profit and Loss Statement, consolidated reporting consider FRx as traditional tool or Microsoft Management Reporter as the alternative to FRx for newer versions 2010 and 10.0.
Slight Exertion With Objective-C For iPhone Development
Introduction
Objective-C is a programming language designed to enable sophisticated object-oriented programming; it is nothing more than a superset of the C programming language and it supports all the basic syntax of the C language, which means that theoretically a program written in C should compile as an Objective-C program without any change.
Most object-oriented environments which is provided for the development consist of several parts, some of them are:
A language which is object-oriented programming
A library of objects
A package of development tools
A runtime environment
What will you need?
I will not focus on building iPhone applications throughout this tutorial because first you learn the programming language used in the iPhone app development. This tutorial will concentrate more on the language (Objective-C) basic concepts and for that you just need a Mac with a compiler like GNU Compiler Collection (GCC).
If you have already installed the Xcode package and Interface Builder from Apple’s Site then GCC was automatically installed. If not, then first you will need to register for an Apple Developer Connection account. Once you have registered, login and click Download Software then in Developer Tools you can download the required software.
Windows users (which is unlikely because this tutorial is written aimed at iPhone developers) can also compile Objective-C on your system using CygWin or the MinGW compiler.
Here you will learn the skills necessary to program in Objective-C using a style that is easy to follow, rich in examples and accessible to those who have never used Objective-C before.
Here we covered the fundamentals of Objective-C and object oriented programming. So, for that let’s quickly look at the predefined Data Types and Operators of Objective-C.
List of data types and qualifiers supported by Objective-C
int Data Type
char Data Type
float Data Type
double Data Type
id Data Type
BOOL Data Type
Special Characters/Escape Sequences
a – Sound alert
b – Backspace
f – Form feed
n – New line
r – Carriage return
t – Horizontal tab
v – Vertical tab
\ – Backslash
” – Double quote (It is using when we want to place a double quote into a string declaration)
‘ – Single quote (It is using when we want to place a double quote into a string declaration)
Objective-C Data Type Qualifiers
long
long long
short
signed / unsigned
Now you we will look the list of Objective-C Operators
Arithmetic Operators
Operator Description
-(unary) Negates the value
* Multiplication
/ Division
+ Addition
– Subtraction
% Modulo
Assignment Operators
Compound Assignment Operators
Operator Description
x += y It is used to Add x and y, and store result in x.
x -= y It is used to Subtract y from x and store result in x.
x *= y It is used to Multiply x by y and store result in x.
x /= y It is used to Divide x by y and store result in x.
x %= y It is used to Modulo on x and y and store result in x.
x &= y Send the result to x of logical AND operation on x and y.
x |= y Send the result to x of logical OR operation on x and y.
x ^= y Send the result to x of logical Exclusive OR on x and y.
Increment and Decrement Operators
Comparison Operators
Operator Description
x == y True if x is equal to y.
x > y True if x is greater than y.
x >= y True if x is greater than or equal to y.
x >= n Shift x right by n places and send result to x.
Objective-C requires the interface, implementation and instantiation of a class to be in separately declared code blocks which use the file extensions (I will describe that in detail later in this article):
Extension
Source type
.h It holds the class, type, function, and constant declarations.
.m It holds the source files and can contain both Objective-C and C code.
.mm It contain C++ code in addition to Objective-C and C code. This extension should be used only if you actually refer to C++ classes or features from your Objective-C code.
First Program: Welcome Objective C
Starting with a simple “Welcome Objective C” program as I am written this tutorial for iPhone Development, I choose Xcode for creating Objective-C programs. Start writing the program by launching Xcode; you just need to choose the “Foundation Tool” under “Command Line Utility” and give a name to your program. For example I chose here “WelcomeObjectiveC”, now the project window will open and you will see the highlighted file, “WelcomeObjectiveC.m”, start writing your program in this file.
Example
#import
int main (int argc, const char *argv[])
{
NSLog (@”Welcome, Objective C”);
return (0);
}
Now first build the program and then run it by clicking the Build and Go button or pressing. If there aren’t any nasty errors in your program, Xcode successfully compiles and runs your program.
To see the output of your program, open the Xcode console window. You can open the console window by selecting Console from the Run menu or pressing.
And there you have the output in the console window:
Welcome, Objective C
Now see how the code works.
In the first line I import the Foundation.h file and this whole import statement informs the compiler to look at the Foundation.h header file in the Foundation framework.
Now you ask what is Foundation Framework? OK, first see what is Framework: A framework is a collection of parts-header files, libraries, images, sounds, and more-collected together into a single unit.
Foundation Framework: The Foundation framework defines a base layer of Objective-C classes and the Foundation framework is designed with these goals in mind (said by Apple):
It is provides a small set of basic utility classes used in the programs.
Introduces consistent conventions such as Deallocation which make software development easier.
Supports Unicode strings, object persistence, and object distribution.
Provide a level of OS independence, to enhance portability.
Next is Main Function
int main (int argc, const char *argv[])
{
//Function Code
}
The main function (as in standard C) tells the Objective-C compiler where to start program execution. In the main function you see the various fields as follows:
return type: Specifies the data type of the result returned by the function. If the function does not return a result then void should be specified.
function name: It is the name by which the function will be referenced when it is called from within the application code. Note that, unless otherwise specified using the static specifier, function names are global and must be unique within the context of an application to avoid compilation errors.
argn type: The type of the argument passed through to the function.
argn name: The name by which the argument is to be referenced in the function code.
Now comes to NSLog() and @”strings”
NSLog (@”Welcome, Objective C”);
Here NSLog() is a Cocoa function which is used to print the value in Objective-C. In NSLog we pass the string between double quotes started with @ symbol that is represent as Objective-C language keywords.
After execution of main() is finished the zero value is returned by a “return (0);” statement which says that our program completed successfully.
Interface, Implementation and Instantiation
You can use Objective C to develop full fledged iPhone applications; it revolves around objects. It has three parts:
Interface
Implementation
Instantiation
Interface
Interface is a object class in Objective-C, by convention, developers place the interface in a header file, it contains the class declaration and defines the instance variables and methods associated with the class. The interface is suffixed by.h, parentheses contained all the variables which is associated with the interface, but the methods are declared outside of the parentheses, yet still inside the structure formed by an opening @interface and a closing @end.
Structure of Interface
@interface Fraction: NSObject
{
// instance variables
int numerator;
int denominator;
}
-(void) setNumerator: (int) num;
-(void) setDenominator: (int) den;
-(void) print;
@end //Fraction
Code Walk
Start from the first line:
@interface Fraction: NSObject
The above line of code informs the compiler that a new interface for a new class named Fraction is created and NSObject specifies that the Fraction class is based/inherited from the NSObject class.
{
// instance variables
int numerator;
int denominator;
}
Now to the template design; the above is a template we create within curly braces which is used to work with the Fraction object. Here we declare two elements numerator type-of integer and denominator again type-of integer, we can say they are instance variables to these elements.
When we talk about the variable declaration, first we need to tell the compiler what we’re going to store and in what type-of. Here are some of the most important variables types that you should know about for now:
int: For storing integers (numbers with no decimal point).
char: For storing a character.
float: For storing numbers with decimal points.
double: Same as a float but double the accuracy.
Now come to method declaration.
-(void) setNumerator: (int) num;
-(void) setDenominator: (int) den;
-(void) print;
The above code lines are just method declarations. In a method declaration you have to give the name of each method, the method’s return type, and any
arguments. But the above code looks a little different; not a simple method declaration, isn’t it? Yep, first remember that methods are of two types and the defining syntax is also two types:
First which are defined using the plus sign (+)
Second which are defined using the negative sign (-)
What is difference between these two methods? Methods which define using the plus sign (+) are class methods, they operate on all instances of the interface. They do not have access to any specific instance variables defined in the interface. Methods defined using the negative sign (-) are instance methods, they operate on a specific instance of the interface. They can access the variables associated with an instance of the interface.
Returning to the previous code, in the first two lines we just start the method declaration with a leading dash sign and the return type is in parentheses then the name of the method “setNumerator and setDenominator” then the trailing colon after the method name is a hint to compilers and humans that a parameter is coming next, then the type of the argument is in parentheses and at last the parameter name exists.
In the last line of the method declarations part we just print without returning anything.
@end // Fraction
We write the above line at the end; it ends the declaration of the Fraction class.
Implementation
After the interface declaration let’s proceed to the implementation of the interface; as you have learned the interface only declares the class interface and not the methods themselves; the actual code is written in the implementation. Implementation (method) files normally have the file extension.m. Interface implementation is like definition of the interface. All implementations are contained within an @implementation… @end block. One more thing that must be done when the implementation is done, that is importing the interface.
Structure of implementation
#import
@implementation Fraction}
-(void) print
{
printf( “%i/%i”, numerator, denominator );
}
-(void) setNumerator: (int) numN
{
numerator = numN;
}
-(void) setDenominator: (int) denD
{
denominator = denD;
}
@end
Code Walk
Start from the first line:
#import
As I already explained the Objective-C interface definition was contained in the file “Fraction.h”. At the time of implementation we need to import this file at the beginning such as shown in the above code. Why? To include any module that creates an instance of the class, sends a message to invoke a method declared for the class, or mentions an instance variable declared in the class.
Implementation for class Fraction
@implementation Fraction
In the above code @implementation is a directive which introduces the code for the guts of a class. After witting @implementation we write the name of the class. There is no trailing semicolon on this line, because you don’t need semicolons after Objective-C directives.
Now define the individual methods
-(void) print
{
printf( “%i/%i”, numerator, denominator );
}
-(void) setNumerator: (int) numN
{
numerator = numN;
}
-(void) setDenominator: (int) denD
{
denominator = denD;
}
In the first line we print the values and you will see a sign of “%i” that is a formatting sign used because we were including an integer. Other variables have their own format specifiers:
%i: integer
%f: float
%e: double
%c: char
That actually implements the methods; in the above code we declared methods in the same manner as in the interface file, but without the semicolon. One thing more to notice here is that we renamed the parameters because it’s better for the parameter names to differ between the @interface and the @implementation. Then inside the body of the method code will refers to the instance variables.
The last line:
@end
Closes the block of implementation.
Instantiation
When you are using Objective-C on the iPhone you will need to allocate memory as well as create an object. To allocate memory you send an alloc message to the class itself; this process is called instantiating. When you instantiate an object, memory is allocated, and then that memory is initialized to some useful default values; that is, something other than the random values you get with freshly allocated memory.
Structure of Instantiation
int main( int argc, const char *argv[] )
{
// creating a new instance
Fraction *frac = [[Fraction alloc] init];
// set values
[frac setNumerator: 2];
[frac setDenominator: 5];
// simple print
printf( “The value of fraction is: ” );
[frac print]; printf( “n” );
// release the memory
[frac release];
return 0;
}
Here the output will be:
The value of fraction is: 2/5
Code Walk
Instance Creation
Fraction *frac = [[Fraction alloc] init];
The above is how you instantiate an object, here we will use a constructor that is generally prefixed with the word “init” or simply init. An initializer returns an instance – usually the same instance, initialized. Therefore you can, and always should, call alloc and the initializer in the same line of code.
Set the values
[frac setNumerator: 2];
[frac setDenominator: 5];
The above code line is just simply calling the setNumerator and setDenominator method on frac, and passing it the parameter 2 and 5.
Printing
printf( “The value of fraction is: ” );
[frac print];
printf( “n” );
This is simply calling the print method on frac and prints the values/output.
Free the memory
[frac release];
When using Objective-C on the iPhone you must release objects that you have created using alloc, new or copy. This has to do with memory management. This is also functionally equivalent to C/C++; all three languaes do not use garbage collection. To release an object you simply send the “release” message to the object.
Let’s Program with Multiple Parameters
In Objective-C you can use a method with multiple parameters. These parameters can be of the same type or of a different type.
Let’s look at an example to clarify use of multiple parameters:
In class.h
#import
@interface Class:NSObject{ }
// declare method for multiple parameter
-(int) sub: (int) i andj: (int) j andk:(int)k;
@end
The main thing is that the separator in the arguments are “:”; you can set any number of arguments using “:”.
In class.m
#import
#import”Class.h”
@implementation MyClass
-(int) sub: (int) i andj: (int) j andk:(int)k;
{
return i+j+k;
}
@end
In main
#import
#import”Class.m”
int main()
{
Class *class = [[Class alloc]init];
printf(“Subtraction is: %d”,[class sub: 16 andj: 8 andk:5]);
[class release]; return;
}
The Output is:
Subtraction is: 3
Designated Constructor
Constructors are to create and initialize an instance of a class. For a class, there can be multiple constructors with various parameters expecting some initial variables. But in Objective-C, first you allocate memory on the heap. Next you call a method called an initializer, which is kind of Objective-C’s equivalent of a constructor.
See the Example
Class Header: Employee.h
#import
@interface Employee: NSObject
{
NSString* name;
int age;
int mobileNumber;
}
Class Implementation: Employee.m
#import “Employee.h”
@implementation Employee
-(id)init
{
self = [super init];
if(self)
{
//Initialization code here.
name=@””;
age=0;
mobilenumber=0;
}
return self;
}
@end
Code Walk
First I created a standard Employee class; it does not consist of any methods, just some simple member variables; namely name, age, and mobilenumber.
Then in the implementation you see a method called “init”. It is the standard initializer method that Xcode creates as a boilerplate for each new class file you create, this method is used to initialize a newly created object and put it into a safe state, exactly as constructors do in C# or C++.
Access Privileges
In Objective-C, access privilege can only be specified on variables. Default access in objective-C is @protected. Types of access privileges are:
@public
@private
@protected
The @protected accessor enables access elements in the subclass.
Exception handling
Using GNU Compiler Collection (GCC) version 3.3 and later, Objective-C provides language-level support for exception handling. An exception is a special condition that interrupts the normal flow of program execution. There are a variety of reasons why an exception may be generated. It works like in every other modern language: they are represented by classes inheriting (usually) from NSException.
NOTE: Exception handling is only supported in Mac OS X 10.3
Compiler directives used for exception handling:
@try: block which throws an exception.
@catch: defines how to handle exceptions thrown by a try block; this is usually an NSException object.
@finally: it is executed whether an exception is thrown or not.
@throw: once your program detects an exception, it must propagate the exception to code that handles it. This code is called the exception handler. This entire
process of propagating an exception is referred to as “throwing an exception”.
Exception-Handling Algorithm
mug *mug = [[mug alloc] init];
@try
{
[mug fill];
}
@catch (NSException *exception)
{
NSLog(@”main: Caught %@: %@”, [exception name], [exception reason]);
}
@finally
{
[mug release];
}
Catching the Exception
@try {… }
@catch (CustomException *cex) {… }
@catch (NSException *nex)
{
// Processing necessary at this level…
}
@catch (id uex) {… }
@finally
{
// Processing necessary…
}
Throwing Exceptions
NSException *exception = [NSException exceptionWithName: @”MugfullException”reason: @”The mug is full of water”userInfo: nil]; @throw exception;
Inheritance
Inheritance brings something of a real-world view to programming. It allows a class to be defined that has a certain set of characteristics and then other classes can be created derived from that class. The derived class inherits all of the features of the parent class and typically then adds some features of its own. In addition to inheriting from classes we can also extend classes. When we extend a class, we take an existing class and add additional functionality to what is already available.
inheritance.gif
Let?s understand the above diagram, first take NSMutableString. NSMutableString has NSString for a parent, meaning it inherits from NSString. Meanwhile, NSString has NSObject as a parent, so it inherits from NSObject, then NSMutableArray has NSArray for a parent, which means it inherits from NSArray. Meanwhile, NSArray has NSObject as a parent, so it inherits from NSObject, then the last NSNumber has NSValue for a parent, meaning it inherits from NSValue. Meanwhile, NSValue also NSObject as a parent, so it inherits from NSObject.
Is new technology nothing without new terms to learn? Exactly, so here are some new terms of inheritance:
Super class: The superclass is the class you were inheriting from.
Parent class: Another word for “Âsuperclass” is Parent class.
Sub class: The subclass is the class doing the inheriting.
Child class: Child class is another word for ”subclass”.
Override: You override an inherited method when you want to change its implementation.
Let’s take a Circle and Rectangle example of see how inheritance works. Look at the following figure, I am going to explain this by example:
inheritance1.gif
In drawing.h
@interface drawing: NSObject
{
DrawShape bounds;
}
– (void) setBounds: (DrawShape) bounds;
– (void) draw;
@end // drawing
In drawing.m
@implementation drawing
– (void) setBounds: (DrawShape) b
{
bounds = b;
}
// setBounds
– (void) draw { } // draw
@end // drawing
In Circle.h
@interface Circle: NSObject
{
DrawShapebounds;
}
– (void) setBounds: (DrawShape) bounds;
– (void) draw;
@end // Circle
In Circle.m
@implementation Circle
– (void) draw
{
NSLog (@”drawing a circle at (%d %d %d %d) in %@”, bounds.x,
bounds.y, bounds.width, bounds.height,
} // draw
@end // Circle
In Rectangle.h
@interface Rectangle: NSObject
{
DrawShape bounds;
}
– (void) setBounds: (DrawShape) bounds;
– (void) draw;
@end // Rectangle
In Rectangle.m
@implementation Rectangle
– (void) draw
{
NSLog (@”drawing rect at (%d %d %d %d) in %@”, bounds.x, bounds.y,
bounds.width, bounds.height,
} // draw
@end // Rectangle
In main
int main (int argc, const char * argv[])
{
id shapes[2];
DrawShape shap1 = { 5, 5, 20, 40 };
shapes[0] = [Circle new];
[shapes[0] setBounds: rect0];
DrawShape shap2 = { 50, 60, 70, 80 };
shapes[1] = [Rectangle new];
[shapes[1] setBounds: rect1];
return (0);
} // main
In the output you will see:
Drawing a circle at (5 5 20 40)
Drawing a rectangle at (50 50 60 70)
Memory Management
In the Apple’s library it says “The basic model used for memory management in a reference-counted environment is provided by a combination of methods defined in the NSObject protocol and a standard method naming convention. The NSObject class also defines a method, dealloc, that is invoked automatically when an object is deallocated.”
memory_management.jpg
For memory management you call [obj retain], which increases its “retain count” (number of references); and when you no longer need it, you call [obj release]. When the counter reaches zero, dealloc is then called.
Syntax of dealloc
-(void) dealloc
{
//Message of deallocation.
printf( “Deallocing fractionn” );
[super dealloc];
}
Commonly used messages in memory management which you send to an abject are:
alloc
new
retain
release
autorelease
copy
Golden Rules of Cocoa memory management:
Retaining the Object: Retaining the object means to increment the retain count of any object and send it the retain message. The retain message increments the object’s reference count, and the release message decrements it.
One more thing to remember to do is to release every object that you create with the “alloc” keyword.
Releasing the Object: To decrement the retain count of any object, send it the release message.
Here I am giving an example of retainCount:
In NewClass.h
#import
@interface NewClass:NSObject
// NewClass declaration.
@end
In NewClass.m
#import “NewClass.h”
@implementation NewClass
// NewClass definition.
@end
In main
#import “NewClass.m”
#import
int main()
{
// objects in NewClass.
NewClass *newClassObj1 = [[NewClass alloc] init];
NewClass *newClassObj2 = [[NewClass alloc] init];
// current internal count of the objects.
printf(“newClassObj1 retain count is: %d n “, [newClassObj1
retainCount]);printf(“newClassObj2 retain count is: %d nn”,
[newClassObj2 retainCount]);
// increment counts
[newClassObj1 retain];
[newClassObj2 retain];
[newClassObj1 retain];
// print counts.
printf(“newClassObj1 retain count is: %d n “,[newClassObj1
retainCount]);printf(“newClassObj2 retain count is: %d nn “,
[newClassObj2 retainCount]);
// Decrement counts.
[newClassObj1 release];
newClassObj2 release];
[newClassObj1 release];
// print counts.
printf(“newClassObj1 retain count is: %d n “,[newClassObj1
retainCount]);printf(“newClassObj2 retain count is: %d n “,
[newClassObj2 retainCount]);
// now deallocate objects.
[newClassObj1 release];
[newClassObj1 release];
return 0;
}
The Output is:
newClassObj1 retain count is: 1
newClassObj2 retain count is: 1
newClassObj1 retain count is: 3
newClassObj2 retain count is: 2
newClassObj1 retain count is: 1
newClassObj2 retain count is: 1
Protocol
A protocol in Objective-C is like interfaces in C#. It declares methods that can be implemented by any class. It is a way to require classes to implement a set of methods. We define a protocol much like a class or a category, it is essentially a list of methods. Protocol declarations look similar to a class declaration, they are frequently used to specify the interface for delegate objects.
Protocols are of the two types formal and informal. A formal protocol is declared with the @protocol directive; whereas informal protocols are actually categories, and declared as categories. So yes, it’s odd but they use categories to implement informal protocols. The benefit of a formal protocol over informal is the compiler can ‘type check’ to ensure an object conforms to the protocol that’s expected. With informal, it’s up to the developer to ensure this.
Situations in which Protocols are useful:
First it is used to declare methods that others are expected to implement.
We can also use to declare the interface to an object while concealing its class.
The third last but not least situation, used to capture similarities among classes that are not hierarchically related.
Methods in a protocol are required to be implemented in a class by default. But you can specify methods as optional too.
@optional
@required
@protocol UserProtocol
– (void) RMethod1;
@optional – (void) OMethod1;
– (void) OMethod2;
@required
– (void) RMethod2;
@end
Wrap Up
This is a basic overview of Objective-C. As you’ve seen, the language is pretty easy to pick up. There’s not all about the language I am trying to cover only the basic syntax to learn.
If you like this small contribution, I am looking for your encouragement.
8 Ways to Partition Elements in a LINQ Query Using the Take and Skip Methods
LINQ – The Take and Skip methods
The partitioning LINQ methods are used to fetch or skip elements from the beginning of an enumerable list while a condition yields true. The Take and Skip methods, and TakeWhile and SkipWhile methods, are complements of one another, meaning that if we concatenate the results from any of these two functional complements we will end up with the same sequence that we started with. These methods are available from.NET Framework 3.5 and onwards.
We will be using IEnumerable<T> collections to hold the films and film studios that are used in the example code. The film collection is of the type List<Film> and is named films and the film studio collection is of the type List<FilmStudio> and is named filmStudios.
The return value from the methods is an IEnumerable<T> containing the items satisfying the condition that you can continue to query; and all necessary information needed to perform the action is stored inside the result.
You can use the methods as extension methods (instance methods) on any object that is of type IEnumerable<T>.
Deferred execution is used when calling any of the methods, which means that the query will not be executed until either a foreach loop is used, or one of the GetEnumerator, ToList, ToArray or ToDictionary methods is called directly on the on the result.
If the source collection is null, an ArgumentNullException exception will be thrown.
Note that we don’t have to specify a type when calling the methods, the pre-compiler will figure out the correct type automatically.
These are the variations of the four methods that we will be looking at in this article.
- Take<T>
- The Take<T> Method with a Nested Query
- TakeWhile<T>
- TakeWhile<T> Indexed
- Skip<T>
- Skip<T> Nested
- SkipWhile<T>
- SkipWhile<T> Indexed
The Take<T> Method
The Take method is used to fetch items from the beginning of an enumerable sequence for as long as the limiting condition is true.
If the number of items stated in the Take methods’ parenthesis is greater than the available number of items in the collection, all items will be returned. If the number of items stated is less than one an empty result is returned.
Let’s say we have a collection of Film objects from which we want fetch the first 3 films, after the Take method has been called the result would be of the System.Linq.Enumerable.TakeIterator<Film> type.
var result = films.Take(3);
If you prefer to use LINQ syntax, the following code would yield the same result.
var result = (
from f in films
select f
).Take(3);
Using the sample data the query would return:
———- TAKE ———-
Star Wars
The Hobbit
Mad Max
The Take<T> Method with a Nested Query
The Take method can be used on a nested LINQ query to fetch a pre-determined number of items. The following example fetches the first 3 films and their corresponding film studio; to achieve this we use a second LINQ query nested within the first query. We then use the Take method on the outer LINQ query and store the each of the films using instances of the ExtendedFilm class.
var result = (
from f in films
select new ExtendedFilm
{
Title = f.Title,
Studio = (
from s in filmStudios
where s.ID == f.StudioID
select s.Name).First(),
Rank = f.Rank
}
).Take(3);
Using the sample data the query would return:
———- TAKE NESTED ———-
Star Wars Lucas Arts
The Hobbit MGM
Mad Max MGM
The TakeWhile<T> Method
The TakeWhile method is very similar to the Take method with the difference that it uses a limiting Lambda expression as a means to determine which items that will be fetched; items will be fetched as long as the expression yields true.
Let’s say we have a collection of Film objects from which we want fetch all the films up to the film with the title “Mad Max”, after the TakeWhile method has been called the result would be of the System.Linq.Enumerable.TakeWhileIterator<Film> type.
var result = films.TakeWhile(f => f.Title!= “Mad Max”);
The following use LINQ syntax would yield the same result.
var result = (
from f in films
select f
).TakeWhile(f => f.Title!= “Mad Max”);
Using the sample data the query would return:
———- TAKE WHILE ———-
Star Wars
The Hobbit
The TakeWhile<T> Method Indexed
The indexed TakeWhile differs from the Take method in that it takes limiting Lambda (predicate) function as a parameter; the function has two parameters, the first is the current item and the second is the index of the current item. The TakeWhile method will return items as long as the condition of the predicate function yields true
The following sample code would return any film from the source sequence starting from the beginning for as long as the index is less than the StudioID.
var result = films.TakeWhile((f, index) => index < f.StudioID);
Using the sample data the query would return:
———- TAKE WHILE INDEXED ———-
Star Wars
The Hobbit
The Skip<T> Method
The Skip method will skip a given number of items from the beginning of an enumerable sequence and return the remaining items from the sequence.
If we pass in a value greater than the available number of items in the collection in the Skip methods’ parenthesis, an empty result will be returned; if the passed in value is less than one all items will be returned.
Let’s say we have a collection of Film objects from which we want skip the first 3 films, the result would be of the System.Linq.Enumerable.SkipIterator< Film> type after the Skip method has been called.
var result = films.Skip(3);
The same result would be fetched using the following LINQ syntax.
var result = (
from f in films
select f
).Skip(3);
Using the sample data the query would return:
———- SKIP ———-
Monsters Inc.
Toy Story
RoboCop
Captain Phillips
The Skip<T> Method with a Nested Query
You can still use the Skip method even if it is on a nested LINQ query if you want to skip a number of items in the sequence and fetch the remaining items.
The following example we fetches the remaining films and their corresponding film studio after we have skipped the 3 first items in the collection. To fetch the film studio name we use a second LINQ query that we assign to the Studio property of the ExtendedFilm class instances that are created for each fetched item.
var result = (
from f in films
select new ExtendedFilm
{
Title = f.Title,
Studio = (
from s in filmStudios
where s.ID == f.StudioID
select s.Name).First(),
Rank = f.Rank
}
).Skip(3);
Using the sample data the query would return:
———- SKIP NESTED ———-
Monsters Inc. Pixar
Toy Story Pixar
RoboCop Sony Pictures
Captain Phillips Sony Pictures
The SkipWhile<T> Method
As long as the limiting Lambda expression yields true that is passed in as a parameter to the SkipWhile method, items will be skipped starting from the beginning of the enumerable sequence; once the expression yields false the remaining items in the sequence are returned.
Let’s say we have a collection of Film objects from which we want fetch all the films starting with “Mad Max”, the result would be of the System.Linq.Enumerable.SkipWhileIterator< Film> type after the SkipWhile method has been called.
var result = films.SkipWhile(f => f.Title!= “Mad Max”);
The following code would yield the same result.
var result = (
from f in films
select f
).SkipWhile(f => f.Title!= “Mad Max”);
Using the sample data the query would return:
———- SKIP WHILE ———-
Mad Max
Monsters Inc.
Toy Story
RoboCop
Captain Phillips
The SkipWhile<T> Method Indexed
The indexed SkipWhile method is very similar to the Skip method, with the difference that it uses a limiting Lambda (predicate) function to determine which items that should be skipped; items will be skipped starting from the beginning of the sequence as long as the expression yields true; a zero-based index that is passed into the function that represent the position of the current item in the source sequence.
The following sample code would skip any film from the source sequence starting from the beginning of the sequence for as long as the index is less than the StudioID.
var result = films.SkipWhile((f, index) => index < f.StudioID);
Using the sample data the query would return:
———- SKIP WHILE INDEXED ———-
Mad Max
Monsters Inc.
Toy Story
RoboCop
Captain Phillips
Example data
public List<Film> films = new List<Film>()
{
new Film{Title=”Star Wars”, StudioID=001,
Rank = new List<double> {7.8, 5.6, 9.5}},
new Film{Title=”The Hobbit”, StudioID=002, ActorID = 002,
Rank = new List<double> {7.2, 6.6, 8.5}},
new Film{Title=”Mad Max”, StudioID=002, ActorID = 001,
Rank = new List<double> {6.8, 5.6, 9.0}},
new Film{Title=”Monsters Inc.”, StudioID=003,
Rank = new List<double> {7.8, 7.6, 9.2}},
new Film{Title=”Toy Story”, StudioID=003,
Rank = new List<double> {6.8, 6.6, 6.5}},
new Film{Title=”RoboCop”, StudioID=005,
Rank = new List<double> {7.6, 7.7, 7.5}},
new Film{Title=”Captain Phillips”, StudioID=005, ActorID = 003,
Rank = new List<double> {8.4, 8.5, 8.6}}
};
public List<FilmStudio> filmStudios = new List<FilmStudio>()
{
new FilmStudio(){Name=”Lucas Arts”, ID=001},
new FilmStudio(){Name=”MGM”, ID=002},
new FilmStudio(){Name=”Pixar”, ID=003},
new FilmStudio(){Name=”HBO Films”, ID=004},
new FilmStudio(){Name=”Sony Pictures”, ID=005}
};
Example Classes
class Film
{
public string Title { get; set; }
public int StudioID { get; set; }
public int ActorID { get; set; }
public List<double> Rank { get; set; }
}
class ExtendedFilm: Film
{
public string Studio { get; set; }
}
class FilmStudio
{
public string Name { get; set; }
public int ID { get; set; }
}
Execute Loops In Parallell With Parallel Foreach
For and Foreach
Normally when you want to iterate over a collection you use for, foreach, while or do loops. When using a foreach loop you iterate over all the elements in a collection, unless you specifically tell it to end prematurely; the collection can be anything from a simple list to a table in a dataset.
When using a for loop to iterate you need to specify three values in the declaration part of the loop:
- The first is an integer variable that will be used as an index position while looping. You also have to give the index a starting value.
- The second is the limitation of the index; how many iterations the loop will do. The loop will iterate until this expression yields false .
- The third is the increment or decrement of the index counter.
Parallel Execution
In some situations it is not efficient to use regular loops such as for and foreach; There will be instances when you need to speed up the execution, the solution is to use parallel execution. You can use parallel execution to execute methods in parallel instead of sequentially; the same applies to for and foreach loops. Let’s say that you have a method that executes several loops synchronously that take a long time to finish; to solve this dilemma you can have the loops execute in parallel on separate threads instead. By calling one of the For or ForEach methods on the static Parallel class, passing the method an Action <T> , you can do just that.
The Task Parallel Library contains the Parallel class that holds a number of methods that can be used to execute tasks at the same time, such as letting loops execute in parallel.
Parallel Foreach
The ForEach method on the static Parallel class has many overloads that takes different parameter lists; the simplest one takes two parameters:
- A collection you want to iterate over, of type IEnumerable <TSource> .
- A delegate function that will be executed once per iteration, of type Action <TSource> .
Parallel For
In a parallel for loop the data type Int32 is used for the from and to parameters of the loop, and the index parameter is executed as an Action <Int32> once per iteration. The Action <T> is typically a pre-defined method that is called as a delegate; but you could just as well use an inline method if that is more appropriate for your code.
Example of parallel execution
In the following example we use the ForEach method on the static Parallel class to iterate over a list of students; we execute the method PrintStudent for each student, to print the first name of student.
Note that the first parameter in the loop is the list of students, and the second is a Lambda expression that goes to the method that will be executed for each of the students in the list. The Lambda expression is a delegate defined with PLINQ that point to the method that will be executed.
private void ParallelLoop_Click (object sender, RoutedEventArgs e)
{
   Parallel.ForEach(students, student => PrintStudent (student));
}

private void PrintStudent (Student student)
{
  Console.WriteLine(student.FirstName);
}Convert to C # Effectively
Recently, my business made the wise decision to convert to C #, an object-orientated programming language developed by Microsoft. We chose to do so because the C # language includes facets of numerous other programming languages (prominently Delphi and Java) and has a meticulous emphasis on simplification.
Yet, for a decision that seemed so astute and pragmatic for the future of our company, we were presented with quite a few dilemmas when we approached our programmers about the switch. We did not realize just how long such an endeavor would take; our programmer would have to spend months performing a huge re-write. And because of the length of the project, we would end up spending thousands and thousands of dollars in salaries and billable hours. Not to mention, we were concerned about the possibility of human errors that could possibly even further delay the re-write being completed after waiting months.
So we decided to do some research on what our options for converting to C # were. We came across a software program that was designed to quickly and efficiently convert applications to C #, not only saving us a substantial amount of money but months and months of valuable working time as well. The software could convert 50 lines of code per second, much faster than a programmer could do it.
After using the code migration software, we were very pleased with the results. The whole process took mere hours to complete, so our busy programmers were able to focus on my pressing, time sensitive work. A huge perk of the software was it was intuitive and easy to use; It even was equipped with a tutorial. The company that provided the software also had free telephone and email customer support. So if you are looking to convert to C # , consider using code migration software.
10 Best Practices to Secure ASP.NET Core MVC Web Applications
ASP.NET Core MVC is a web development framework, widely used by developers around the word, to develop web applications. These web applications have proven to be vulnerable to attacks from different sources, though, and it is our responsibility to safeguard our data. This article will help you develop a secure ASP.NET Core MVC web application.
Cross-Site Scripting (XSS)
What is Cross-Site Scripting?
Injecting a malicious script through the input/form field of a webpage with the intension to steal confidential information such as login credentials or other authentication information, cookies, and session values is called a cross-site scripting (XSS) attack.
Script injection can be carried out in the following ways:
- Form Inputs
- URL Query Strings
- HTTP Headers
How to Prevent Cross-Site Scripting
Cross-site scripting attacks can be prevented in the following ways:
- Regular Expression Attributes
- Regular Expression Object Model
- HTML Encoding
- URL Encoding
Regular Expression Attribute
You can use regular expressions to validate the user’s form inputs. So, you can deny malicious characters, symbols, or allow only acceptable required characters in the input field before allowing the user to proceed further.
To learn more about regular expression attributes, refer to the RegularExpressionAttribute Class docs.
Regular Expression Object Model
Just like the regular expression attribute, using the regular expression object model, you can validate user inputs by calling static methods of the Regex class.
To learn more about the regular expression object model, refer to The Regular Expression Object Model.
HTML Encoding
The MVC Razor engine automatically encodes all inputs so that the script part provided in any field will never be executed.
URL Encoding
Usually, we use plain text in URL query strings, which can be used to launch XSS attacks. So, we should encode the query parameter input in the URL.
We have a built-in library in NuGet for encoding and decoding the text:
string encodedValue = System.Net.WebUtility.UrlEncode("raw-string-text");
string decodedValue = System.Net.WebUtility.UrlDecode(encodedValue);
SQL Injection
What is SQL Injection?
It is a dangerous attack wherein unauthorized users inject malicious SQL code that then runs in your database, allowing the attackers to access confidential information stored in it.
Refer to the Wikipedia article on SQL injection to learn more about SQL injection.
How to Prevent SQL Injection
The SQL injection attack can be prevented in the following ways:
- Validate inputs
- Use stored procedures
- Use parameterized queries
- Use Entity Framework or any other ORM
- Use least-privileged DB access
- Store encrypted data
Validate Inputs
Defending against SQL injection by validating inputs requires the following actions:
- Validate the user inputs on both the client side and server side.
- Do not allow special characters that are involved in SQL scripts.
- Use regular expressions and data annotations to validate inputs.
Use Stored Procedures
Using stored procedures will prevent SQL injection, but we should still validate the input parameters passed to the stored procedures.
Use Parameterized Queries
If you want to use inline queries, you must use parameterized queries to prevent SQL injection. The following code example demonstrates a parameterized query.

Use Entity Framework or any other ORM
ORM stands for object-relational mapper, which maps SQL objects to your application class object.
If you are using Entity framework properly, you are not prone to SQL injection attacks because Entity Framework internally uses parameterized queries.
Use Least-Privileged DB Access
We should limit the DB user permissions for tables that have confidential data. For example, we should restrict the insert, update, and delete permissions for tables related to payments and transactions, and we should also limit permissions for tables that store a user’s personal information.
If a user only works with Select queries, then we must give permission only to the Select statement, and should not provide permissions for Insert, Update, and Delete statements.
Store Encrypted Data
We should not store confidential information like email addresses and passwords as plain text in a database. It should be stored in an encrypted format.
Cross-Site Request Forgery (CSRF)
What is Cross-Site Request Forgery?
An attacker acts as a trusted source and sends some forged data to a site. The site processes the forged data because it believes it is coming from a trusted source.
To learn how this attack works, refer to the Cross-Site Request Forgery (CSRF) article on the OWASP wiki.
Let’s discuss an example of this type of attack: when a user transfers funds from one bank account to another, a trusted connection is established between the user and the bank site after the user logs in successfully.
At the same time, the user clicks a malicious link in an email sent by an attacker.
As the secure session is already established between the user and the bank site, the attacker uses this connection and performs some malicious activity such as fund transfers.
However, this attack is only a risk on the server side (web application), not the end-user side.
How to Prevent Cross-Site Request Forgery
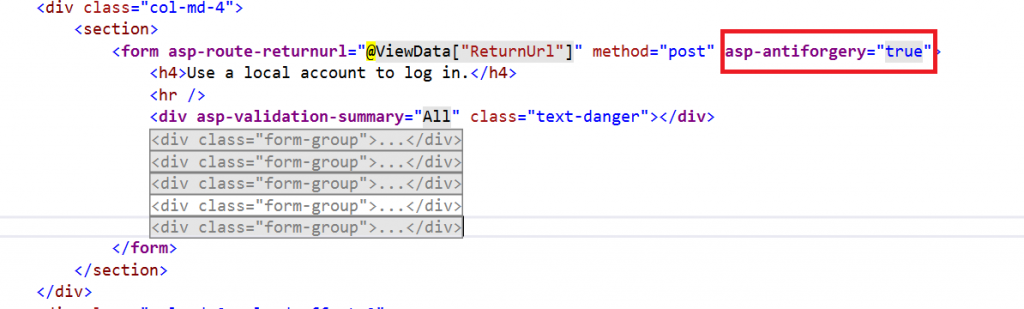
We can prevent this attack by using AntiForgeryToken.
We can use the HTML tag helper asp-antiforgery in an HTML attribute and set its value as true. By default, this value will be false. If we set this value as true, it will generate an anti-forgery token. Then, we need to add the [ValidateAntiForgeryToken] attribute to the form post action method to check whether a valid token is generated.
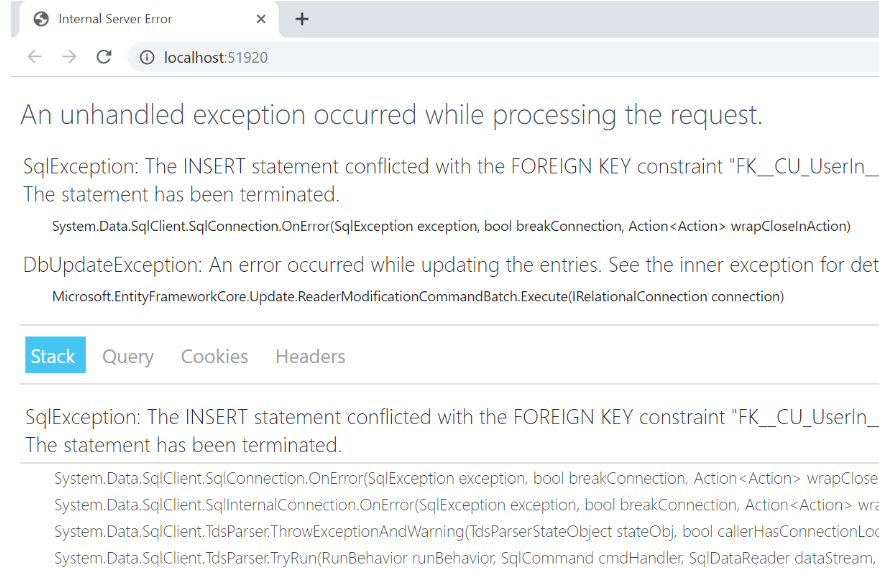
Custom Error Page for Error Handling
Sometimes you may not properly write error-handling code in your web application. This can lead us to expose sensitive information such as database configuration info, table names, stored procedures, data structures, and programming coding structure to users.
How to Add Proper Custom Error Handling
There are two ways to add custom error-handling pages in an ASP.NET Core application.
The first approach is to create a custom error-handling attribute using ExceptionFilterAttribute. This attribute will handle the exception.
We can override the OnException method and write exceptions in text files organized by date, and then store the files in a desired folder path. We can also store the exception in a database. Finally, we’ll redirect the route to a custom error page as in the following code.
public class CustomExceptionFilterAttribute: ExceptionFilterAttribute
{
//write the code logic to store the error here
var result = new RedirectToRouteResult(
new RouteValueDictionary
{
{"controller", "Error"}, {"action", "CustomError"}
});
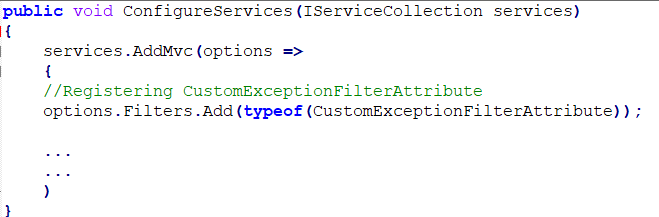
}Then, we need to register this filter globally inside the ConfigureServices method in the Startup.cs file.
Version Discloser
We should hide the version information of what we used to develop the application from end users because if an attacker learns the specific version, then they may try to target an attack on that specific version based on a previously disclosed vulnerability.
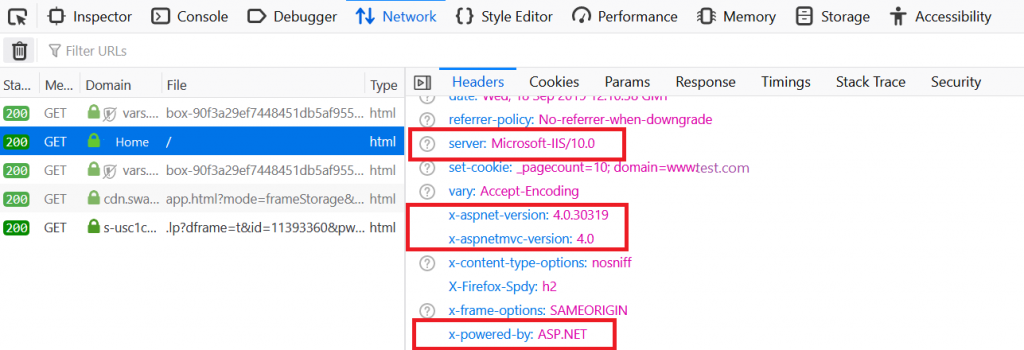
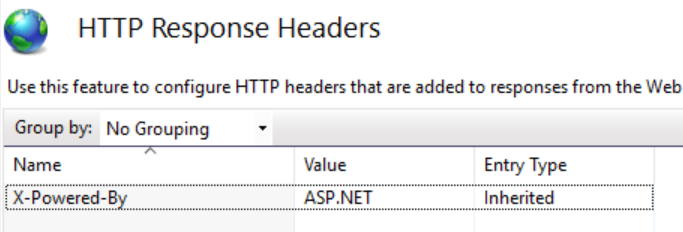
Whenever the browser sends an HTTP request to the server in response, the browser gets a response header, which contains the following information:
- server
- x-powered-by
- x-aspnet-version
- x-aspnetmvc-version
- x-sourcefiles
The server shows information about the web server that is used. For example, a response could contain the following:
- Server: Microsoft-IIS/10.0: Application is hosted by Microsoft-IIS version 10.0.
- X-Powered-By: ASP.NET: This shows the ASP.NET framework your website is running on.
- X-Aspnet-Version: 4.0.30319: This shows the ASP.NET framework version your website is running on.
- X- AspnetMvc-Version: 4.0: This shows the ASP.NET MVC framework version your website is running on.
- X-SourceFiles: This will only be generated for localhost requests and serves debugging purposes.
How to Hide Header Values
Server Header
We can remove the Server header by adding the line “UseKestrel(c => c.AddServerHeader = false)” in the CreateWebHostBuilder method in the Program.cs class.

X-Powered-By Header
To remove the X-Powered-By header, we need to add a web configuration file, and in that web config file, we need to add an element that removes the X-Powered-By element under <system.webServer>.
<system.webServer>
  <httpProtocol>
    <customHeaders>
      <remove name="X-Powered-By" />
    </customHeaders>
  </httpProtocol>
</system.webServer>
We can remove this from the IIS settings too. Select the header and remove it.
X-Aspnet-Version Header
To remove the X-Aspnet-Version header, make the following change in the web configuration file:
<system.web>
  <httpRuntime enableVersionHeader="false" />
</system.web>
X- AspnetMvc-Version Header
To remove the X-AspnetMvc-Version header, add the following line where the application starts in Global.aspx:
protected void Application_Start(object sender, EventArgs e)
{
  MvcHandler.DisableMvcResponseHeader = true;
}
Enforce SSL (Secure Sockets Layer) and HSTS
What is SSL?
SSL stands for Secure Sockets Layer, and it establishes a secure or encrypted connection between client and server. With SSL, the requests passed between the client browser and the server, and the responses from the server to the client browser, will be encrypted to maintain the integrity of the data.
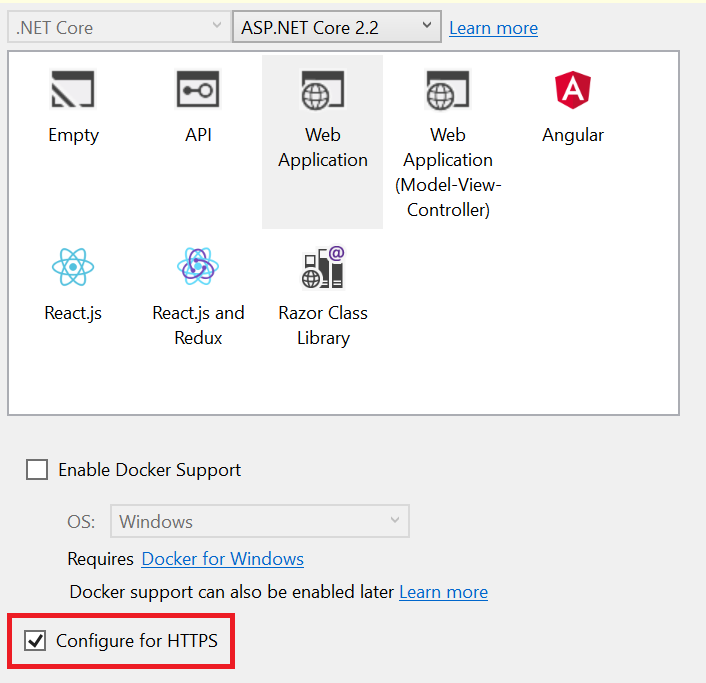
We can use HTTPS (HyperText Transfer Protocol Secure) to secure your ASP.NET Core application.
In ASP.NET Core 2.1 and later versions, we can easily create an application that is configured over HTTPS. We can also configure HTTPS with ASP.NET Core before .NET Core Framework version 1.1, but it is somewhat difficult to do.
An option to configure the web application over HTTPS is available when selecting the web application template in Visual Studio as shown in the following screenshot.
What is HSTS (HTTP Strict Transport Security)?
HSTS is a web security policy that protects your web application from downgrade protocol attacks and cookie hijacking. It forces the web server to communicate over an HTTPS connection. It always rejects insecure HTTP connections.
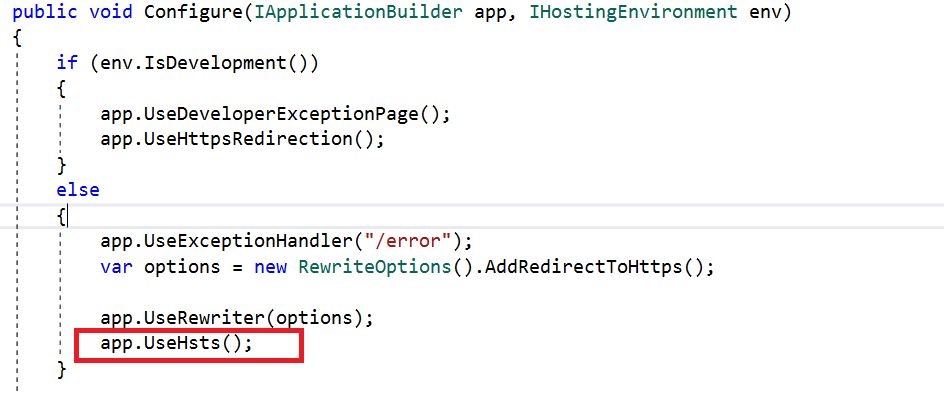
The ASP.NET Core template, by default, adds HSTS middleware. It is not recommended for use in the development environment as the browser caches the HSTS header.
We can override a few options when configuring HSTS. They are:
- MaxAge: Timespan that defines the max-age of the Strict-Transport-Security The default value is 30 days.
- IncludeSubDomains: If this value is set to true, the Strict-Transport-Security header will be available for subdomains too.
- Preload: Adds preload support to the Strict-Transport-Security
- ExcludedHosts: A list of host names that will not add the HSTS header.
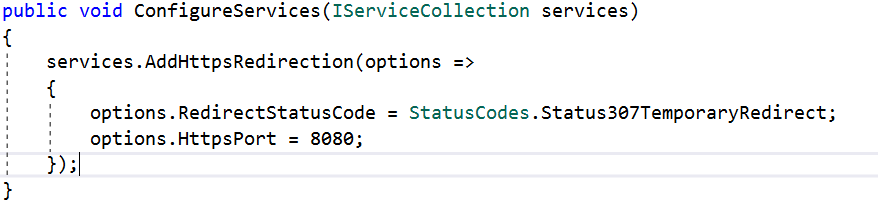
The ASP.NET Core default template also adds another middleware that redirects requests from non-secure HTTP. It uses the default redirect status code (307) to redirect the request. We can also override the default option.

XXE (XML External Entity) Attack
If your application uses logic to parse an XML file that is uploaded by an end-user, you are at risk of an XXE (XML External Entity) attack. In this kind of attack, a weakly configured XML parser processes an XML input that contains malicious XML code or a reference to an external entity. This kind of attack can cause a denial-of-service attack by injecting entities within entities, which makes your server utilization too high, resulting in a server shutdown. This kind of attack is also known as a “billion laughs attack”.
How to Prevent This Attack
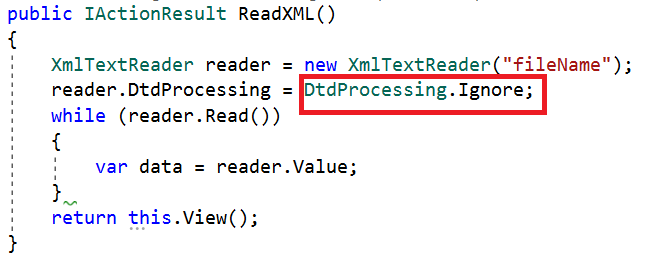
If we use XmlTextReader to parse XML files, we must set the DtdProcessing property to Prohibit or Ignore.
If it is set to Prohibit, an exception will be thrown if a DTD (Document Type Definition) is identified.
If it is set to Ignore, any DTD specification in the document will be ignored and the processing of the document will continue.
If we set it to Parse, it will parse any DTD specifications in the document. DtdProcessing is set to Parse by default. It is potentially vulnerable.
Improper Authentication and Session Management
Most web applications have an authentication module, and we should be careful when writing code for it. We could make mistakes like not removing the authentication cookies after a successful logout. This kind of mistake allows attackers to steal user credentials such as cookies and session values, and may result in attackers being able to access the complete application and cause major negative impacts.
The following mistakes can help attackers steal data:
- Insecure connection (without SSL).
- Predictable login credentials.
- Storing plain (unencrypted) credentials.
- Improper application logouts.
How to Avoid These Mistakes
- Remove cookies after successful logout.
- Secure cookies and sessions by using SSL.
- Secure cookies by setting HTTP only.
Refer to the following code to remove session values and authentication cookies (.AspNetCore.Session) after a user logs out.
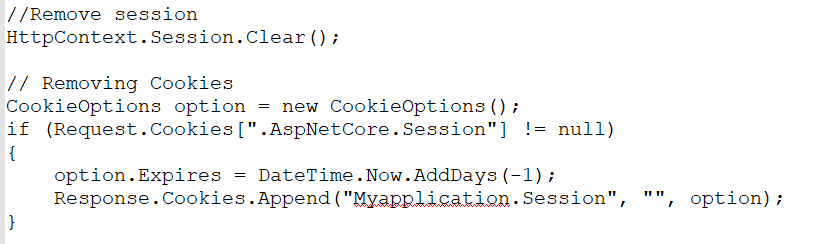
To set HttpOnly on cookies in ASP.NET Core, refer to the following code:
CookieOptions option = new CookieOptions {Expires = DateTime.Now.AddHours(24), HttpOnly = true};HttpOnly is a flag that is used to set any cookie, and it cannot be accessed from client-side scripts.
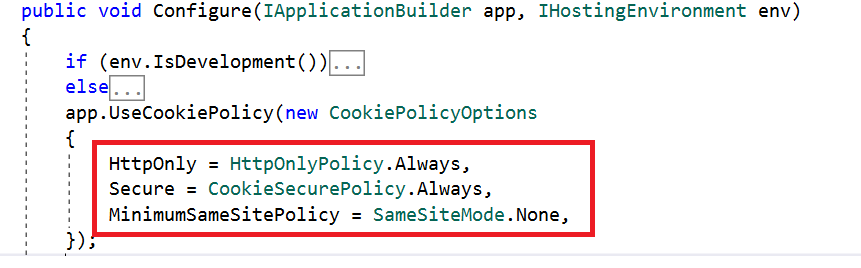
To globally set up HttpOnly, configure the UseCookiePolicy method in Startup.cs as shown in the following screenshot.
Sensitive Data Exposure and Audit Trail
We always manage a user’s personal, important data in web applications. There are many places in an app where we may expose and store sensitive data as if it is ordinary information, or adequately secure some but not all sensitive information without realizing it. If attackers can access sensitive data we overlooked, they will misuse it.
What Do We Need to Do to Avoid These Mistakes?
- Send sensitive data in an encrypted format using a suitable encryption algorithm. For example, passing a customer mail address over a URL with encryption.
- Use SSL and access web applications in production in HTTPS mode.
- Do not store sensitive data that includes database or application code anywhere. If you store it, use a strong encryption algorithm to encrypt the data, and then store it.
Audit Trail
It is a best practice to keep monitoring your production web application’s activity logs at regular intervals. We can set up logs to be collected using IIS logs, or we can store our logs in text files or databases. Based on the logs, we can gather insights on any errors or performance issues in the production application, and also, if anyone tries to attack the application, we can identify their attempts.
File Upload Validation
If your web app has a file upload control, attackers will have the chance to upload malicious script files that cause problems. So, proper file validation is always required.
The main validation we do on files is validate the file extension. However, attackers can change their file’s extension and upload it anyway. For example, if you allow only image files, an attacker can save their script file with a .jpeg extension and upload it. In this case, the file extension validation accepts the file because it considers it an image file, even though it is really a malicious script file.
How to Do Proper Validation
- First, check the file upload count. If the upload count is zero, no file is uploaded. If the upload count is greater than zero, proceed with further validation.
- Check the file extension. This will allow only valid extension files. Sometimes, attackers can still pass malicious files with allowed extensions. In this case, do further validation.
- Check the file content type and file bytes.
- Only allow uploading the file when the previous three steps are successfully validated.
Conclusion
In this blog post, we have discussed 10 best practices for securing ASP.NET Core MVC web applications.